Saturday, October 11, 2025

I had no clue what this was!

by


Introduction and Origin

Brioche is a rich, tender bread that originated in France and is characterized by its high butter and egg content. Its origins date back to the 15th century, where it was considered a luxurious bread reserved for royalty and the upper class.

Today, brioche is loved worldwide for its buttery flavor and soft, airy texture, making it perfect for both sweet and savory dishes.

Cultural Significance
Brioche holds a special place in French cuisine, often served during celebrations and holidays. It is versatile, used in dishes like French toast, bread pudding, or even as a base for gourmet burgers.

Its rich flavor represents indulgence, and its golden crust symbolizes warmth and tradition.

Ingredients and Quantities
Flour: 3 1/2 cups (440 g)
Granulated Sugar: 1/4 cup (50 g)
Salt: 1 teaspoon
Instant Yeast: 2 1/4 teaspoons
Whole Milk: 1/3 cup (80 ml), warmed
Large Eggs: 4, room temperature
Unsalted  Butter: 1/2 cup (113 g), softened and cubed

Optional Additions
Sweet Additions:  Chocolate chips, dried fruits, or a swirl of cinnamon sugar.
Savory Additions: Shredded cheese, herbs, or garlic.
Toppings: Sesame seeds, pearl sugar, or a honey glaze.
Tips for Success
Room Temperature Ingredients: Ensure eggs and butter are at room temperature for smooth incorporation.

Proper Kneading: Knead the dough until it is smooth and elastic, about 8-10 minutes with a stand mixer.
First Rise: Let the dough rise in a warm place until doubled in size for a light texture.
Chill Overnight (Optional): Chilling the dough overnight enhances flavor and makes it easier to handle.

Egg Wash: Brush with an egg wash before baking to achieve the signature golden crust.
Instructions
Prepare Dough: In a large mixing bowl, combine flour, sugar, salt, and yeast. Add warm milk and eggs, mixing until a dough forms.

Incorporate Butter: Gradually add the butter, one piece at a time, kneading until fully incorporated.
First Rise: Place the dough in a greased bowl, cover, and let rise for 1-2 hours or until doubled in size.
Shape the Dough: Punch down the dough, shape it into a loaf, and place it in a greased loaf pan.

Second Rise: Cover and let rise again for 45 minutes to 1 hour.
Egg Wash: Preheat oven to 375°F (190°C). Brush the dough with an egg wash (1 egg + 1 tablespoon water).
Bake: Bake for 25-30 minutes, or until the top is golden brown and the loaf sounds hollow when tapped.
Cool: Let cool before slicing and serving.


Description

This brioche loaf is soft, buttery, and slightly sweet, with a tender crumb and a glossy, golden crust. Its aroma is irresistibly rich, making it perfect for breakfast spreads, sandwiches, or enjoying on its own.

Nutritional Information (Per Slice, Approximate)
Calories: 190
Protein: 5g
Carbohydrates: 25g
Fat: 8g
Fiber: 1g
Sugar: 3g
Sodium: 180mg
Conclusion and Recommendation

Brioche is a timeless classic that elevates any meal with its rich flavor and delicate texture. It is perfect for holiday feasts, breakfast indulgences, or a comforting treat.

Embracing Healthful Indulgence
For a healthier twist, consider using whole wheat flour, reducing the sugar, or substituting a portion of the butter with Greek yogurt.

These modifications maintain the richness while adding nutrients.

To store brioche and keep it fresh, follow these tips:

Cooling: Allow the brioche to cool completely after baking. This prevents condensation from forming inside the storage container.
Wrapping: Wrap the brioche tightly in plastic wrap or aluminum foil. This helps to maintain moisture and prevents it from drying out.
Storage: Place the wrapped brioche in an airtight container or a resealable plastic bag. This adds an extra layer of protection against air exposure.
Room Temperature: If you plan to consume the brioche within a few days, you can store it at room temperature. Just make sure it’s in a cool, dry place away from direct sunlight.
Refrigeration: If you want to store it for a longer period (up to a week), you can refrigerate it, but this may affect the texture slightly.
Freezing: For longer storage, brioche freezes well. Wrap it tightly in plastic wrap and then in aluminum foil, or place it in a freezer-safe bag. It can be frozen for up to 3 months. When you’re ready to eat it, thaw it at room temperature or warm it in the oven.

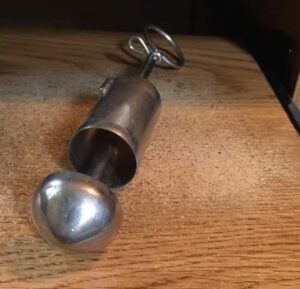
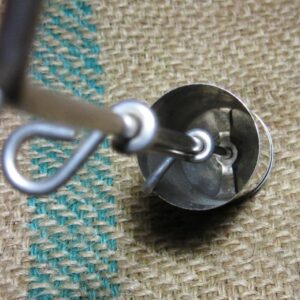
I had no clue what this was!

by


Weird Antique Kitchen Gadgets: A Time Machine in Your Kitchen

Have you ever come across an unusual old cooking tool and thought, “What the hell is that?” That’s exactly what happens to many people when they come across a Vintage Presto aluminum cheese slicer from the 1940s and 1950s. This device is like stepping into a culinary time machine – everyone is taken aback and amazed. Honestly, this slicer is unlike anything we’re used to seeing today. The internet has been trying to figure out what this tool is for, but many have found themselves in awe. As many as 90% of people had no idea and simply dismissed it as a forgotten tool. So, what’s the story behind this mysterious slicer? What was its significance in times past, and why might it even have a place in a modern kitchen?

Continued on next page//

The slicer is made of solid aluminum – lightweight yet sturdy in your hand – with a handle that fits perfectly. When you press it against a piece of cheese, you get smooth and easy slices. It feels like you’ve discovered a secret move in a retro kitchen game. This slicer is not only functional, but its aesthetics also fit into the concept of vintage style that many are looking for today. Imagine medieval dinners, shiny chrome, and cozy kitchens filled with the aroma of baked goods. People of that time knew how to combine style and functionality – like your grandmother’s favorite apron, timeless and useful. Unfortunately, as the years passed, many of these devices disappeared from everyday use, but their value still remains in the minds of those who recognize them.

Continued on next page//

A question that is often asked is: “Why use this old-fashioned device when there are modern slicers?” It’s a great question. While modern slicers offer speed and efficiency, it’s hard to ignore the sense of nostalgia and satisfaction that comes with using traditional tools. There’s something magical about preserving a piece of history in your kitchen. It’s a small connection to the past – one slice of cheese at a time. These old-fashioned tools bring with them not only functionality, but also stories that are associated with them. Many of us remember our grandmothers using similar devices, which further enhances the emotional value of using these tools. So, if you come across this unusual Presto slicer at a flea market or in your grandmother’s kitchen drawer, don’t forget about it. Try it out, wonder a little, and enjoy the nostalgia that comes with it.

Bonus Relic: Antique Milk Cream Separator:

Let’s go back even further – to a time when getting cream out of your coffee required a little patience and a lot of charm. Meet the Chapin Cream Dipper – an almost forgotten kitchen gem. It wasn’t plastic or flashy – this metal beauty was sleek and practical, designed to carefully remove cream from milk jugs. The handle fit perfectly with the ring grip, adding a surprising touch of style to your morning ritual. This tool was a true symbol of a time when food preparation was seen as a ritual, not just a quickie.

Using this tool was part science, part art. The magic happened when the tool reached the front of the bottle – carefully lifting only the creamy top layer, leaving the milk behind. Your coffee (or tea) took on a rich, velvety finish that no machine could offer. Imagine the morning sun shining as the cream gently dripped into your cup, each sip bringing with it a reminder of the smells and tastes of your past. It’s rare to see a tool like this these days. Modern technology has taken over, and gadgets like the Chapin Cream Dipper have become collector’s items. If you’re lucky, you might find one in a thrift store, at an estate sale, or buried deep on eBay.

Why do people still care? Because there’s something special about the way things used to be—slower, more manual, and more intentional. The Chapin Cream Dipper reminds us that sometimes the old ways brought more than just functionality… they brought a little soul to the kitchen. In a world obsessed with youth, wrinkle-free skin, and passing trends, there are women who rise above the noise—those who embody the values ​​of a bygone era. Their relationship to food and cooking is different, deeper, with every tool they use.

Old tools are not just objects; they are tellers of stories , each with its own heritage and experiences. When you use these tools, you connect with the generations that used them before you. These objects are a bridge between the past and the present, giving us a glimpse into how people once prepared meals and spent time in the kitchen. In today’s fast-paced world, where everything is digital, revisiting these simple yet effective tools can bring a sense of accomplishment and pride. What’s more, they are a way to preserve a part of our culture and tradition, no matter how rapid and unpredictable the changes are. Keeping these tools in working order connects us to our roots and culture, creating lasting memories that can be passed on to future generations

Oranges with “big navel” and “small navel” are different

by


The Difference Between Large Navel Oranges and Small Navel Oranges
When we choose oranges, pick up each fruit and pay attention to its navel. While the navel of some oranges is large and round, with a very clear indentation in the middle, most others only have a small dot.

When it comes to quality, there is a big difference between large navel oranges and small navel oranges. When you cut large navel oranges, you will see that the navel is covered with a white membrane, with few segments inside, mostly peel, and an unattractive taste. Generally, the orange segments are not sweet and have less juice than usual.

Small navel oranges, on the contrary, do not have a clear navel, the peel is thin, the segments are more juicy and sweet. Sweetness and water content can be said to be the differences between large navel oranges and small navel oranges. When buying oranges, pay attention to the navel to choose the best fruits.

How to choose delicious oranges
Apart from the navel, when buying oranges, you can rely on the following factors to choose the most satisfactory fruits.

1. Color
The eye-catching orange color is the first thing that catches our eyes when we come to the orange counter, but if you look closely, you will see that oranges have many different shades. The same orange variety, the darker the color, the more sunlight it receives and thus accumulates more sugar inside, making it sweet and juicy. You should choose these fruits.

2. Shape

Read more on next page

The eye-catching orange color is the first thing that catches our eyes when we come to the orange counter, but if you look closely, you will see that oranges have many different shades. The same orange variety, the darker the color, the more sunlight it receives and thus accumulates more sugar inside, making it sweet and juicy. You should choose these fruits.

2. Shape

When buying orange, we often see slightly oval oranges, round oranges, plump oranges, and slightly wrinkled and rough oranges. If you want to eat delicious oranges, choose round oranges because they will be juicy and sweet.

3. Feel by hand

It’s advisable to hold the orange with your hands to feel its weight because a large fruit is not necessarily heavy. It may have a lot of peel and dry segments.

If you feel it is heavy, it is fresh and juicy. Meanwhile, if it feels light, it means that the orange has been picked a long time ago and stored for a long time, and is not delicious.

Additionally, holding the fruit helps you to feel the softness or hardness of the orange. Fresh and ripe oranges have elasticity when you pinch them; if it is difficult to pinch, the fruit has a thick skin and is not delicious.

Save a ton of money on electricity

by


Save a Ton of Money on Electricity with This Simple Refrigerator Tip

Did you know that your refrigerator has a small button that can help save electricity, especially in the winter? Many people are unaware of this feature, but it can significantly reduce your electricity bill.

Why Adjust the Refrigerator Temperature in Winter?

Refrigerators are essential appliances, operating 24/7 to keep our food fresh. However, they are also one of the most energy-consuming devices in the home. According to Vietnam Electricity Corporation (EVN), a large refrigerator can consume between 50 – 75 kWh of electricity per month.Groceries

Groceries

How to Adjust the Refrigerator Temperature:

Identify the Temperature Control: Modern refrigerators have a temperature control knob or display panel with settings ranging from 1-5 or 1-6.
Discover more
Save a ton
SaveAton a part of Wholesale Warehouse Ltd
Save a Ton
Groceries
Cheesecake
Cheese
Chia
avocado
oats
Avocado
Adjust for Winter: In winter, you can lower the cooling level to save electricity. Adjust the temperature to levels 2-3, or even 1. At level 1, the refrigerator temperature will typically range from 2-5 degrees Celsius, which is sufficient for food storage and helps save electricity.
Based on Food Quantity: Adjust the temperature according to the amount of food stored. If the refrigerator is less full, lower the cooling level. For a fuller refrigerator or compartments with fresh food like seafood, maintain a higher cooling level around -18 degrees Celsius.
Additional Tips for Saving Electricity:

Groceries

Optimal Placement: Place the refrigerator in a well-ventilated area, not too close to walls or other heat-generating appliances like microwaves or ovens. This improves heat dissipation and reduces energy consumption.
Limit Door Opening: Avoid opening the refrigerator door for extended periods. Each time the door is opened, cold air escapes, and the compressor has to work harder to maintain the temperature, increasing energy use.
Groceries
Conclusion

By making a simple adjustment to your refrigerator’s temperature control in the winter and following a few usage tips, you can save a significant amount of electricity. This not only reduces your energy bill but also contributes to a more sustainable environment.